Introduction
Welcome to our Sword and Shield Wand solo guide. In this guide, we’ll go over our recommended way to set-up the Sword and Shield Wand weapon combination for Solo Farming. This set-up is primarily used in Abyss Dungeons in the Open World. The weapon combination forms the “Templar” Class.
Skills
Below is our Skill set-up for Solo PVE farming:
This combination of Skills allows for large mob pulls and plans to AoE everything down with defensives and Wand Curse Skills.
Skill Specializations
With 100 total points to play with once you hit Level 50, below is our recommended Specializations for the Sword and Shield Wand Solo build:
These particular Specializations provides a comfortable set-up for farming mobs in large quantities. Your survivability allows for massive pulls and the Wand brings good damage with the help of Provoking Roar and the Spectrum of Agony passive. Shield Strike (Piercing Attack) spam helps massively too. See our Skill Specializations guide for more information.
Weapon Mastery
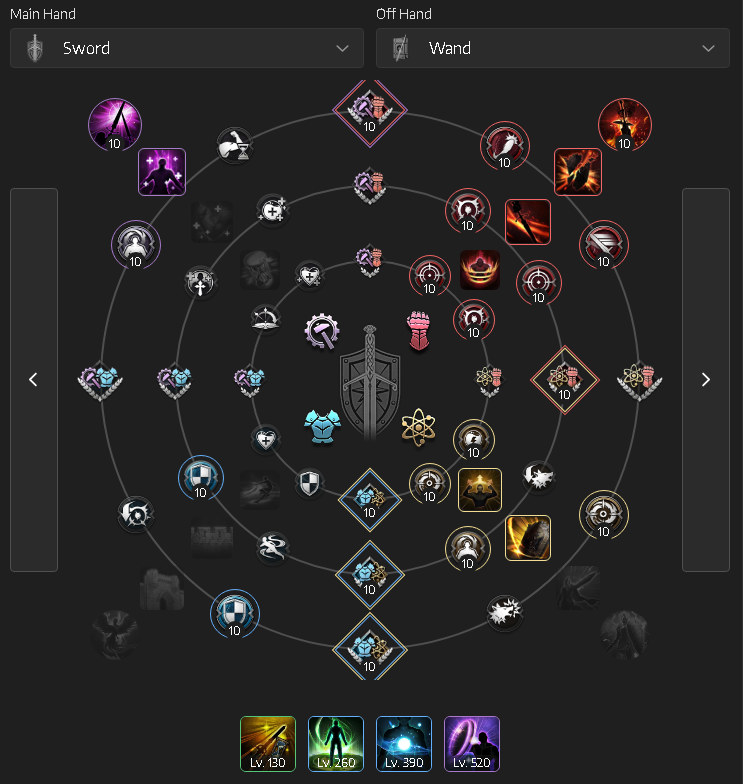
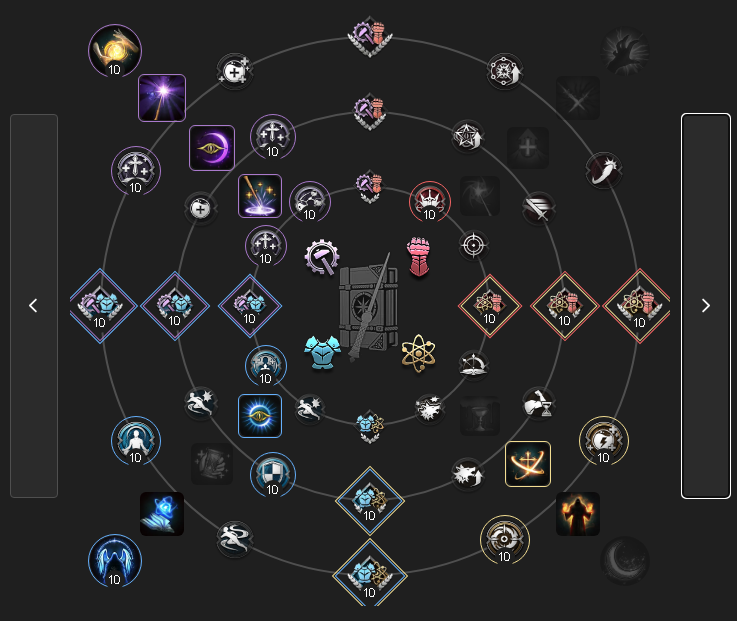
This guide assumes you are at least in the range of 130+ Mastery Level. However, if you’re below this threshold, it’s not an issue. Simply spec into the mastery trees that provide the most damage/utility first.
S&S Mastery

Wand Mastery

Stats
Stats once you reach Tier 1 Epic gear can vary frequently due to stats built into gear. As a result, try to push for at least 60 Strength and 40 Perception while farming – gear depending. Below is our recommended baseline Stat allocation:
- Dexterity – 2 Points
- Perception – 12 Points
- Strength – 21 Points
- Wisdom – 13 Points
Gear & Equipment
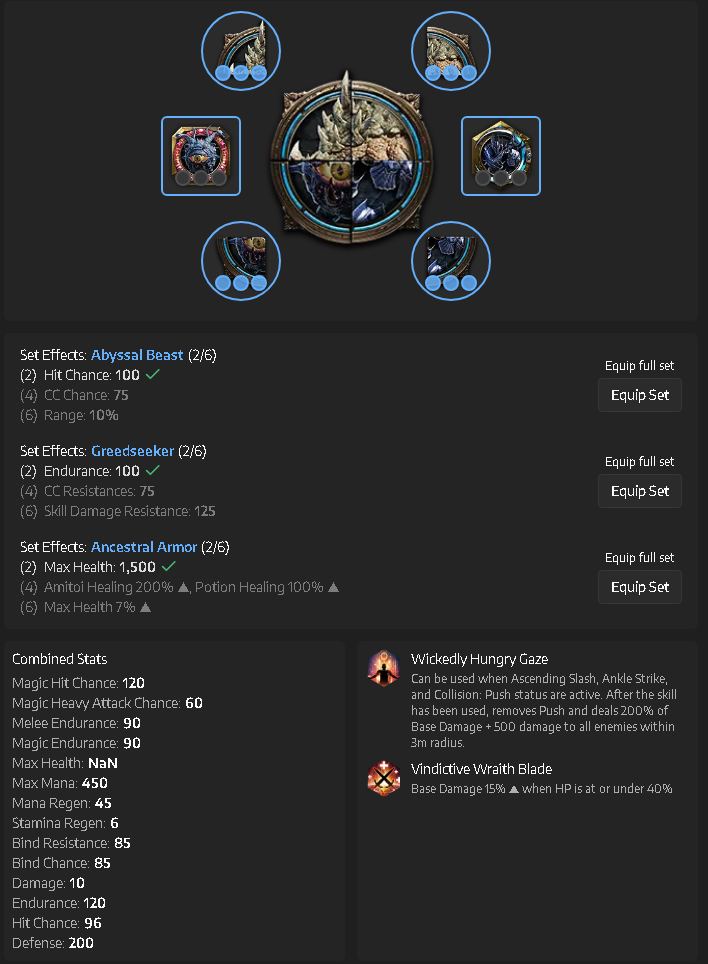
The gear loadout largely, if not entirely, stays the same across all content once you reach Tier 1 Epic. Our Tier 1 Epic set assumes that most of the base content has been unlocked with the Milestones completed.
Early on, make use of your Rare gear you acquired through MSQ. It is totally fine and expected to be in Rare gear for quite a long time – so don’t worry too much! Most of the time, your PVP gear is perfectly fine in PVE.
Tier 2 (T2) Talandre Gear
Tier 2 Gear is only obtainable from the Talandre Expansion patch onwards. The gear can reach level 12 and provides much stronger benefits than Tier 1 gear in Throne and Liberty. Across all content, this gear set-up is optimal as a Tank or Healer to get the job done.
We recommend not worrying too much about Archboss Accessories or Nebula Accessories as they’re very rare and expensive.
Artifacts
The Artifact System is another source of power for your build that provides stats, an Active and a Passive. We have crafted a general starting point for players to use and adapt to their liking below:

Guardian
Guardians are a unique transformation on a 10 minute Cooldown that gives powerful bonuses to you for 30 seconds. Some Guardians work as an additional “Active” Skill, while others provide buffs. We recommend the following Guardians for Solo Farming:
- Shade Revenant Stheno – Stheno is the most offense-heavy choice in PVE. This Guardian dishes out consistent damage dealing projectiles to multiple targets.
- Green Ranger Elowen – Green Ranger can help bind and blast down packs of mobs due to the increased Critical Hit.
How to Play The Sword and Shield Wand Solo Build
Our Sword and Shield Wand Solo guide not only aims to teach you how to put it together, but also how to play it.
The main objective of playing this build solo is to be able to manage multiple mobs alone and efficiently clear them. Fortunately, as a Tank, handling the damage of multiple targets and provoking them is your strong point! As a result, this build heavily focuses on gathering many mobs and clearing them fast with defensives and a burn-down approach.
Skill Rotations
The standard large pack pull rotation is as follows:
- Provoking Roar to taunt the mobs and activate Spectrum of Agony
- Counter barrier
- Piercing Attack
- Ray of Disaster
- Touch of Despair
- Annihilation Blade
- Piercing Attack
- Touch of Despair
- Shield Throw
- Annihilating Slash x2
- Corrupted Magic Circle
- Curse Explosion
The above rotation is a little tricky to get the timing right for, mainly due to keeping track of your curses. However, you can try and simplify parts of the rotation or stack less curses and get by fine. Shield Strike (Piercing Attack) is extremely spam-able and worth a large portion of your damage.
The most important thing to keep in mind is to save your Strategic Rush for after the rotation is over. This is because you’ll reduce the cooldowns of all your rotation thanks to the “Morale Boost” Passive. Most packs of mobs in the game, especially in Abyss Dungeons only require 1-2 of this rotation to clear them all. Finally, try to hold onto your defensives for dangerous situations where you may have over-pulled.
Sword and Shield Wand Solo Guide Conclusion
This concludes our Sword and Shield Wand Solo guide for Throne and Liberty. Consider checking out our PVE group and PVP guides for Sword and Shield and Wand to expand your knowledge. For more Throne and Liberty information, see our main page.

