Life Staff/Rapier Build
Introduction
This build couples the Healing of the Life staff with the elite defensive ability of the Rapier. In our New World Healer Build Guide, we will cover everything you need to know to heal in any New World PVP Activity.
PROS
- Top Tier Healing
- Top Tier Survivability
CONS
- Low Damage
- Minimal Utility
Mastery Points
Life Staff Mastery Points
The way you set up your Life Staff Mastery Points in PVP is completely dependent on what type of healing you are doing. In this section, we’ll break down the two main setups for healing in New World: AOE or Point Healing and Group Healing
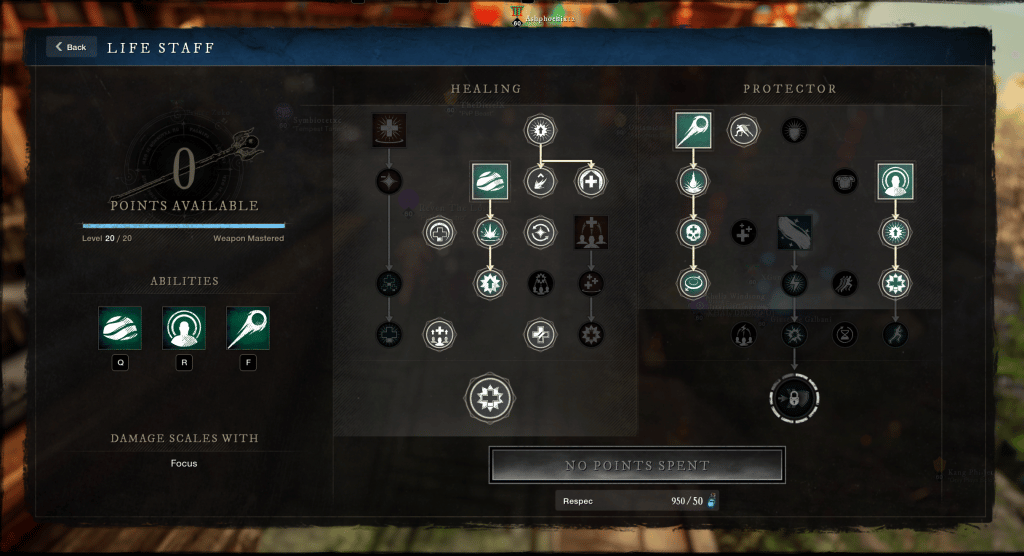
AOE (Point) Healing Mastery Points
Sacred Ground – Beacon – Orb of Protection
The AOE Healing setup is can be used for point healing in wars or in OPR. Sacred ground is the primary cooldown and needs to be used when your group engages in any fight. Casting Beacon and Orb of Protection in your Sacred Ground creates the best defensive environment in New World. Not only will your targets receive massive amounts of Healing over time, but they will also receive 26% fortification(with the Fortifying Sacred Ground Perk).
Below is the Full setup of your Mastery Points for AOE healing

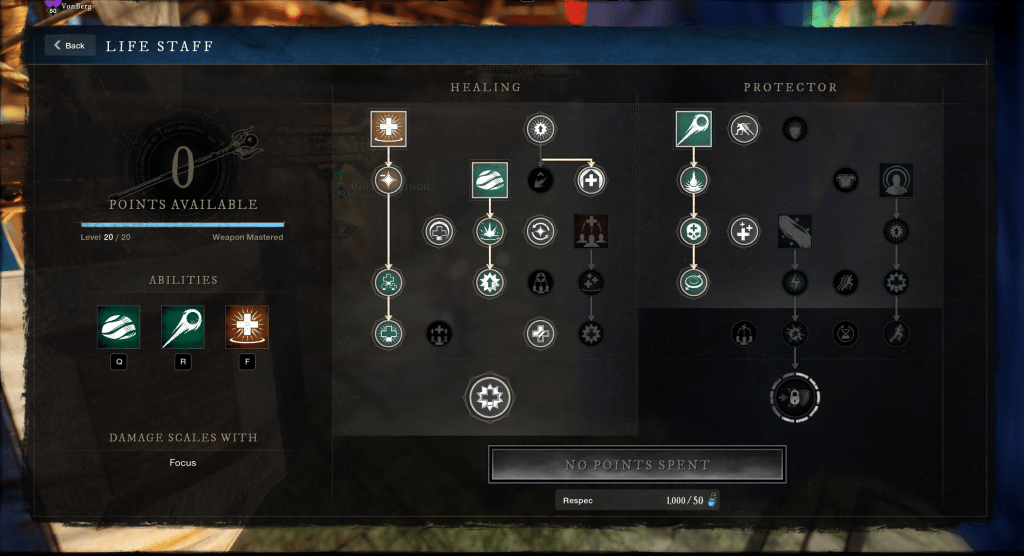
Group Healing Mastery Points
Sacred Ground – Orb of Protection – Divines Embrace
The Group Healing Setup is focused around the Sacred Ground/Orb of Protection combo with Divines Embrace’s single target healing. While Group Healing, your main goal is to stay with your group and keep everyone alive.
Below is the full setup of your Mastery Points for Group Healing.

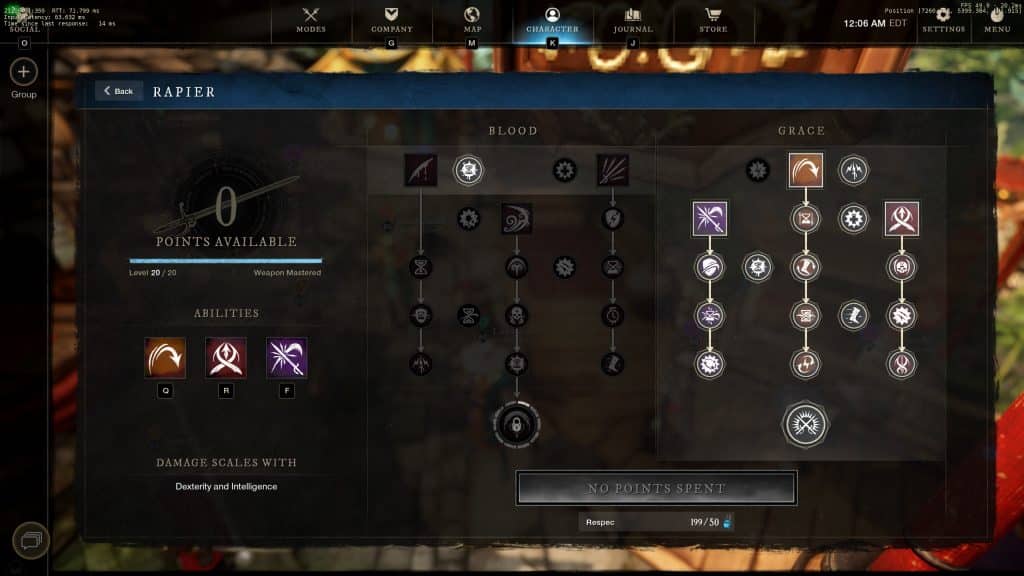
Rapier Mastery Points
Evade – Fleche – Riposte
For your rapier Mastery Points, you will spend all most all of them in the Grace Tree. This side of the Rapier’s Mastery Tree will help you stay alive under pressure from your opponents.
The Full Rapier Mastery Point Set up is below.

Attributes
The ideal setup for this build is 450 Focus 150 Constitution. If you feel like you’re having difficulty with Survivability, move your CON to 200 to get some extra health/crit resistance. If you feel comfortable with using rapier for defense/survivability, you can dare to push more into Focus than 450.
Equipment
The Ideal Equipment Weight for his build. Here are the two most optimal ways to obtain this equip weight.
1.) MED CHEST, LIGHT HEAD, PANTS, GLOVES, BOOTS
2.) LIGHT CHEST, MEDIUM PANTS, (2 LIGHT, 1 MED) HEAD, GLOVES, and BOOTS
Armor
All of the Armor you will want for this build will be custom-made through crafting or bought from the Auction house. Below is the ideal perk spread you will want across all of your armor pieces. They are listed in order of importance from top to bottom. Start with armor with 2 perks on it and work your way up to three!
- Fortifying Sacred Ground
- Refreshing Divines Embrace (Keen Beacon if running AOE Build)
- Refreshing (4)
- Elemental Aversion or Enchanted Ward (5)
- Freedom (3)
Weapons
For Life staff, Will of the Ancients remains one of the best Life Staffs in the New World. It provides Blessed with two cool-down reduction perks. The only thing that can improve it, is a staff with Mending Orb instead of Refreshing. You will need to look for a crafted Life Staff.
Life Staff – Blessed, Refreshing Move, Mending Orb or Will of the Ancients
Rapier – Keen Speed, Sundering Riposte, Keen
Artifact Weapon
There is currently no Life Staff artifact in the game. However, you could potentially use the Artifact Rapier, named “Finisher” as a quick 700 Gearscore pick-up. Although, a standard Rapier at 700 would be better.
Jewelry
For this build, your Jewelry for this build will be Crafted
Amulet – Health, Divine, Refreshing. For an artifact, we highly recommend “Ankh”.
Ring – Sacred, Hearty, Refreshing
Earring – Refreshing Toast, Healthy Toast, Refreshing.
Gems
The Meta and your resistance division will determine what gems you use in your armor. Runeglass of Siphoning Malachites or Runeglass of Siphoning Diamonds is the recommended gems to balance your armor as these provide the most amount of resistance possible.
In your weapons, you’ll want to use the following gems:
- Life Staff – Runeglass of Siphoning Diamond
- Rapier – Runeglass of Siphoning Amber
Heartrune Gem
The Greater Heartrune of Stoneform is the Heartgem we recommend with this build. This creates a “trinket” like PVP ability that allows you to escape heavy amounts of CC and Pressure.
Consumables
Consumables on this build are pretty straightforward. You will want one of each type of Infused potion on your bar (Health, Mana, and Regen) and a Stack of Hearty Meals. When your Health pots are on cooldown, you should use an Infused Regeneration Potion and Hearty Meal together while kiting away to increase survivability and reduce time out of the fight.
Food
You will use food to balance out your gear to your desired Attribute Thresholds. The cheapest food available with the appropriate stats is most likely
- Roasted Rabbit with Seasoned Vegetables
- Slow-Roasted Bear Flank with Root Vegetables
In Wars or other PVP situations where you want to min-max your effectiveness, Tier V Honing Stones and Incense can also be used. You can also use GemStone Dust to avoid spike damage when in bad situations.
How to Use the Build
AOE Healing
AOE Healing is vital to Army and OPR team survival. You will use this Mastery Point setup to heal points in Wars and keep your Team Alive in OPR. A good AOE healer has the biggest potential for Healing Output.
The most important part of the Healing with the AOE setup is uptime. This is where cooldown perks such as Refreshing move and Refreshing come in. There are also other passives in the Life Staff Mastery Tree such as Revitalize that can reduce your cooldowns. The quicker you can recast your Sacred Ground and Beacon, the more healing output you will have. Making sure you can always follow up a Sacred Ground with another Sacred Ground should always be your priority.
Group Healing
Group Healing differs from AOE healing in that you’ll want to save your cooldowns for when your group engages. In group fights, Make sure to lay down Sacred Ground immediately, then cast Orb of Protection for the healing of time and fortification. You’ll use Orb of Protection and Divines Embrace’s short cooldowns to keep people topped off as the fight goes on.
Survivability
The Rapier has all the tools you need to survive most encounters. As you improve, with your rapier and use your cooldowns effectively, you can become practically invincible.
Riposte is an amazing defense ability and allows you to peel for yourself when your team’s not around. Evade and Fleche provide Elite mobility and can help you kite away from your enemies. Evade also gives you back stamina so you can use it in between dodges for maximum distance Traveled.
Typically, you’ll want to use potions on cooldown to keep your health topped off and your Life Staff Abilities available for your allies. But, If you get in a bind or are under a lot of pressure from your enemies, don’t hesitate to use your life-staff abilities for self-preservation.

