Introduction
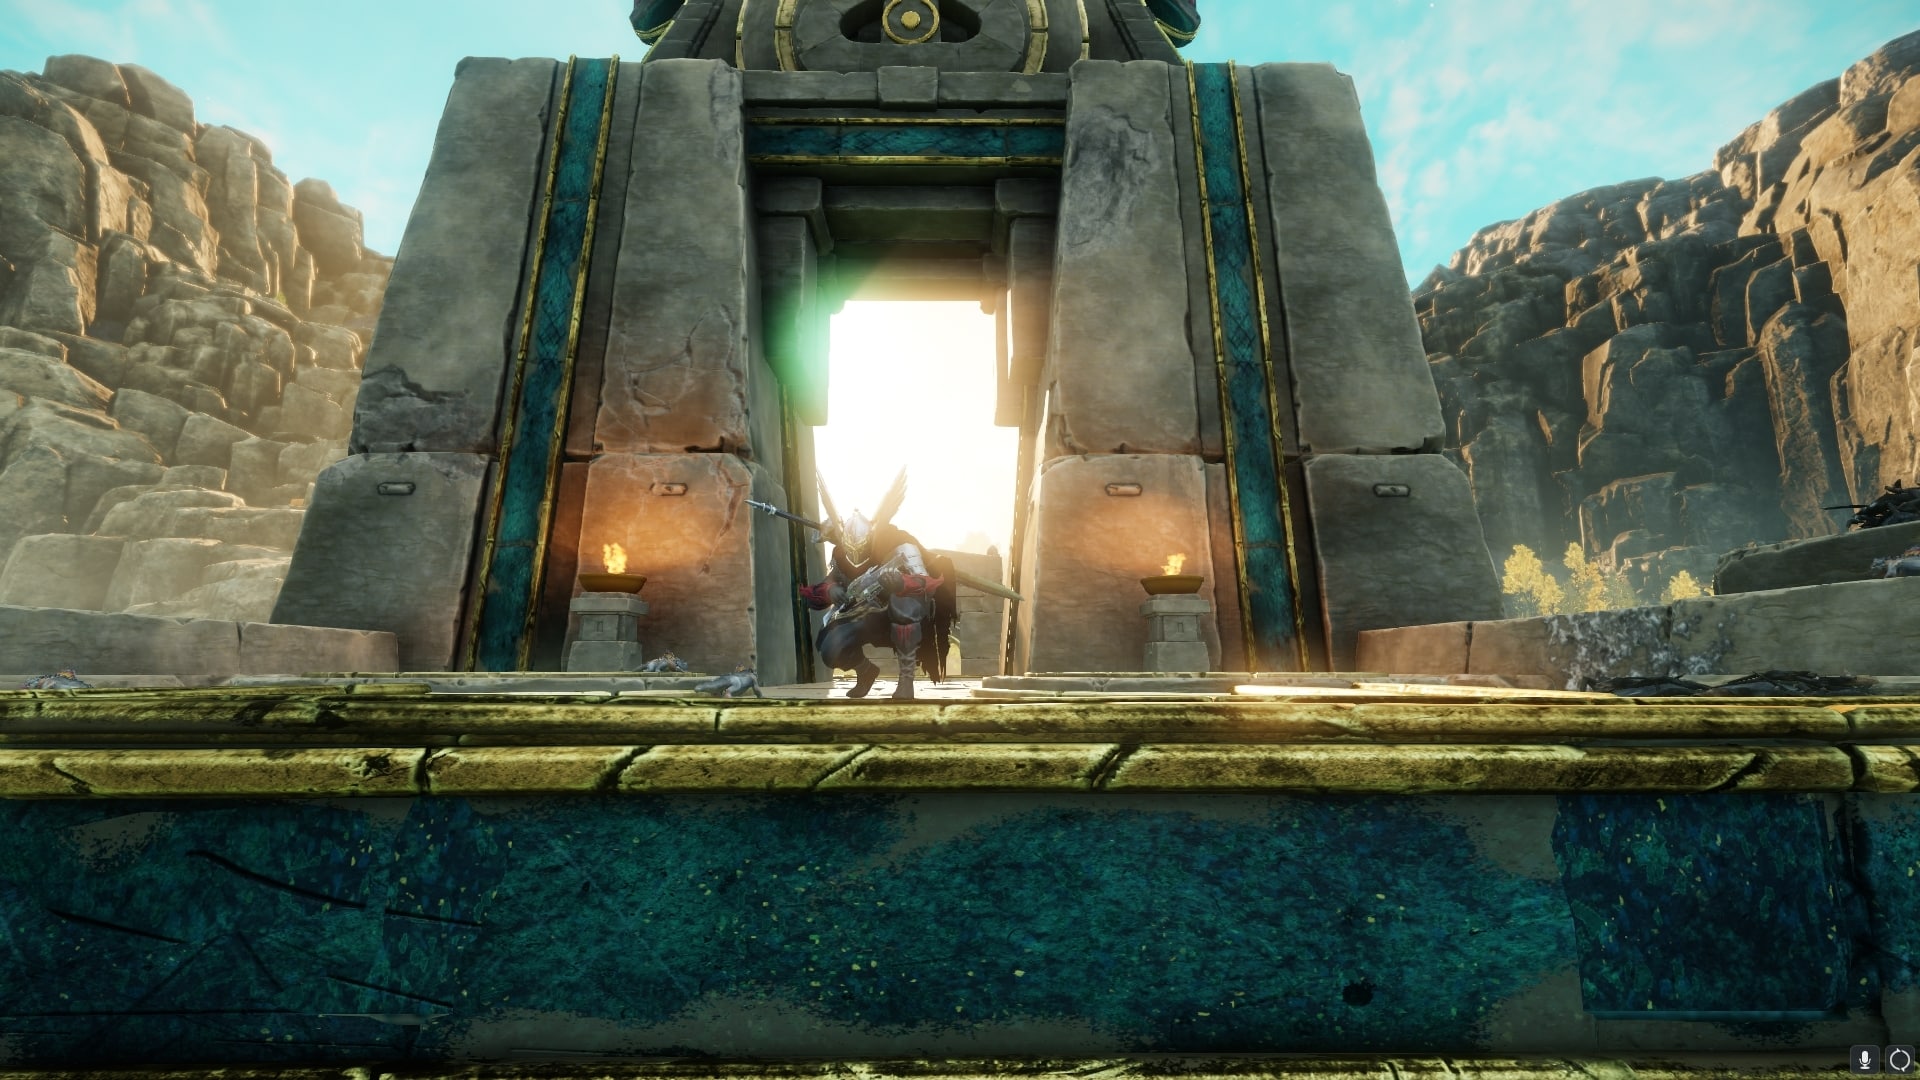
This New World Greatsword Blunderbuss PvP build is a powerful hybrid focused setup. Primarily this build is intended for Outpost Rush and 3v3 PvP Arenas but has had some war success. This build will have great hunting capabilities through the use of mobility abilities and tools the Blunderbuss provides.
Pros
- High single-target and cleave damage
- High mobility
- Ranged options to deal damage or chase down opponents with
- High amounts of damage reduction
Cons
- Less mobility than some other weapon counterparts
- Higher difficulty to play efficiently
- Tough attribute allocation
Mastery Points
Greatsword
For this build, the majority of your burst damage will come from the Greatsword but it also pairs as a strong utility tool. The recommended abilities are:
Relentless Rush
Skyward Slash
Steadfast Strike
OR
Roaring Rupture if you are wearing medium armor.
Relentless Rush is a great movement ability that not only roots your opponent when fully upgraded, but also deals decent damage as a gap closer. This will be crucial to the ability rotation of this build.
Skyward Slash is a fantastic opener ability in the rotation. As a result of applying rend to your target and applying disease when fully upgraded, this ability is a must have and will start off many of your engages.
Steadfast Strike will pull your target towards you in a micro stagger allowing you to setup a full rotation. Also it is worth noting that you gain a good portion of stamina back on hit!
Roaring Rupture is an ability that gains more value when you are wearing medium armor. This particular ability is a strong AoE tool that deals strike damage – a type of damage most players do not heavily resist. However the positive effects do not end there! Roaring Rupture also: applies weaken, gives fortify, but also can give full crowd control immunity for 5 seconds! As a result this allows your full combo to be uninterrupted and provides immense survivability for a medium build.
The remaining passives taken will enhance your overall damage output and smooth out the build.
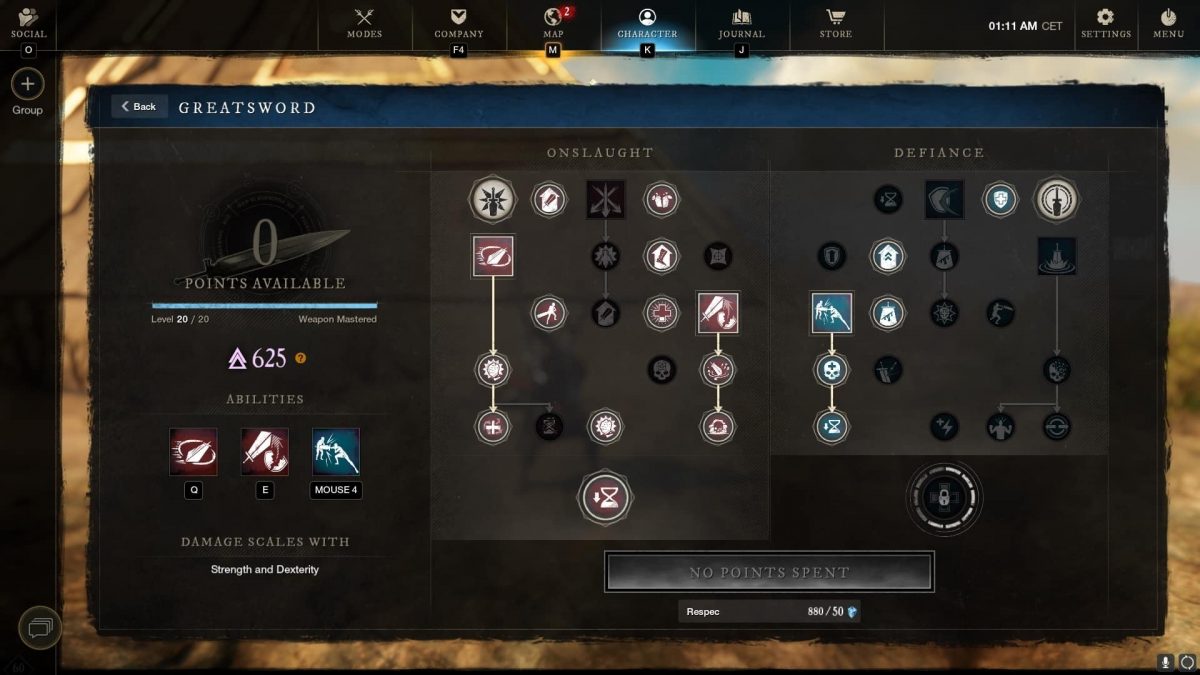
Alternatively, there is also the medium armor mastery build that utilizes Roaring Rupture.
Blunderbuss
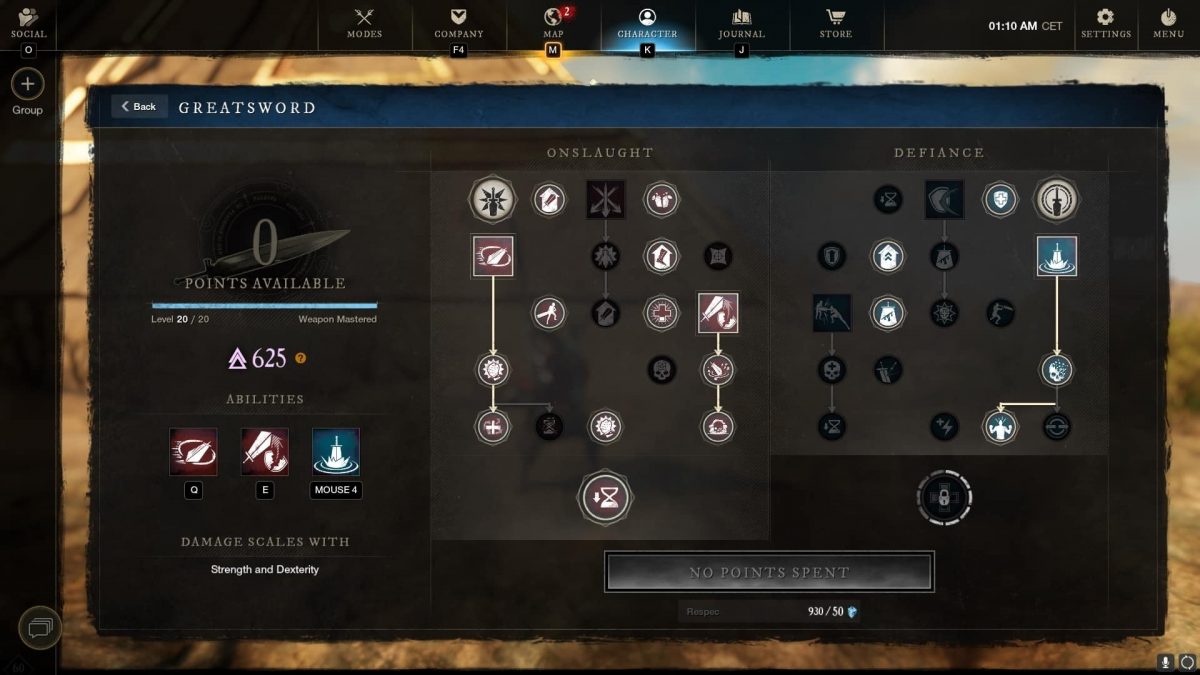
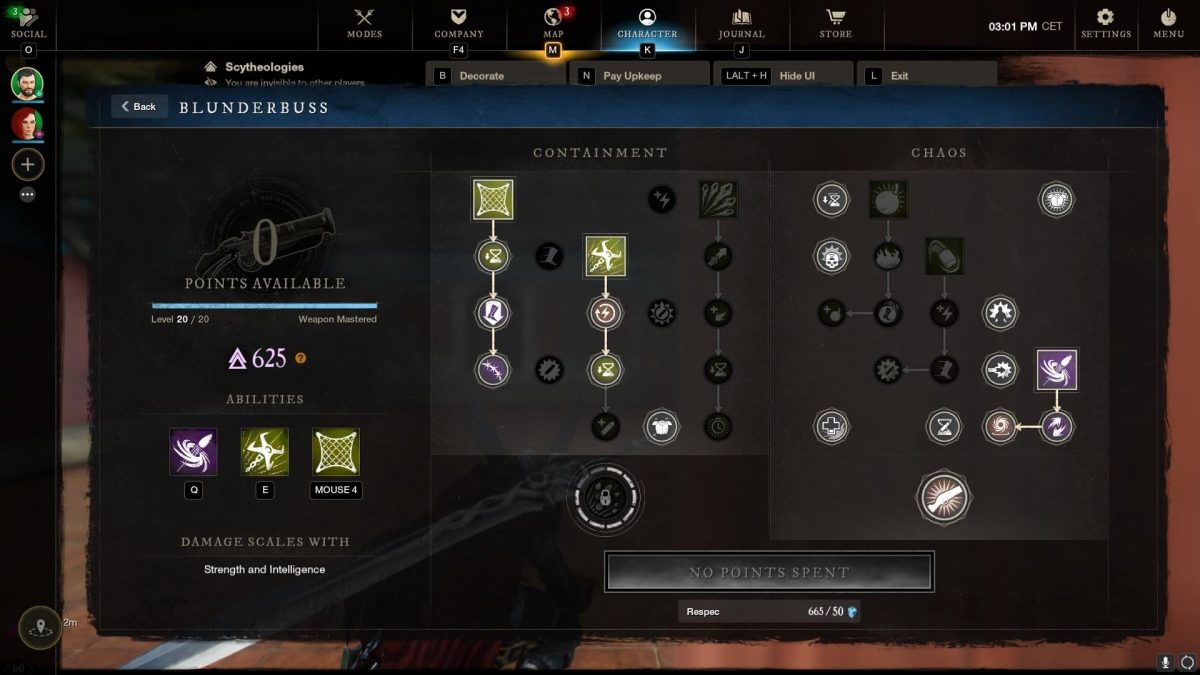
The Blunderbuss is able to be utilized in a few ways depending on how you wish to approach the weapon as a backbar. The option to use the Blunderbuss as a utility tool or a DPS tool along with the damage reduction it provides provides a few options. The recommended abilities are the following:
Azoth Shrapnel Blast
Blast Shot
Net Shot
Alternatively instead of Blast Shot you could play Splitting Grenade providing you have the Plagued Splitting Grenade perk.
In medium armor you will most likely need to drop the Azoth Shrapnel Blast due to the stat distribution change and move into full utility. The recommended abilities are the following:
Blast Shot
Claw Shot
Net Shot
Almost every single ability in the Blunderbuss kit is viable in the build, with medium armor having the most flexibility. The Blunderbuss provides a good mixture of burst damage both single-target and AoE but also good utility through abilities and survivability through Fortify perks.
You are going to want to push for point allocation within the Containment tree in the light version of the build to obtain Unload. As a result of this maxing out on Azoth Shrapnel Blast for maximum damage output and Net Shot to provide a bleed effect and a 7 second slow is a must. However in the Chaos tree you will want to pick up Blast Shot or Splitting Grenades. Although if Blast Shot had been selected by you it makes an easier path in the tree to obtain the Last Chance perk, which is a must-have.
Most of the time the Blunderbuss will be an initiation weapon but also a potential finisher, or a situational flexibility weapon to get you out of awkward situations or even disrupt targets. However the Greatsword is still your main damage source.
The remaining passives will help increase your damage and mitigation.
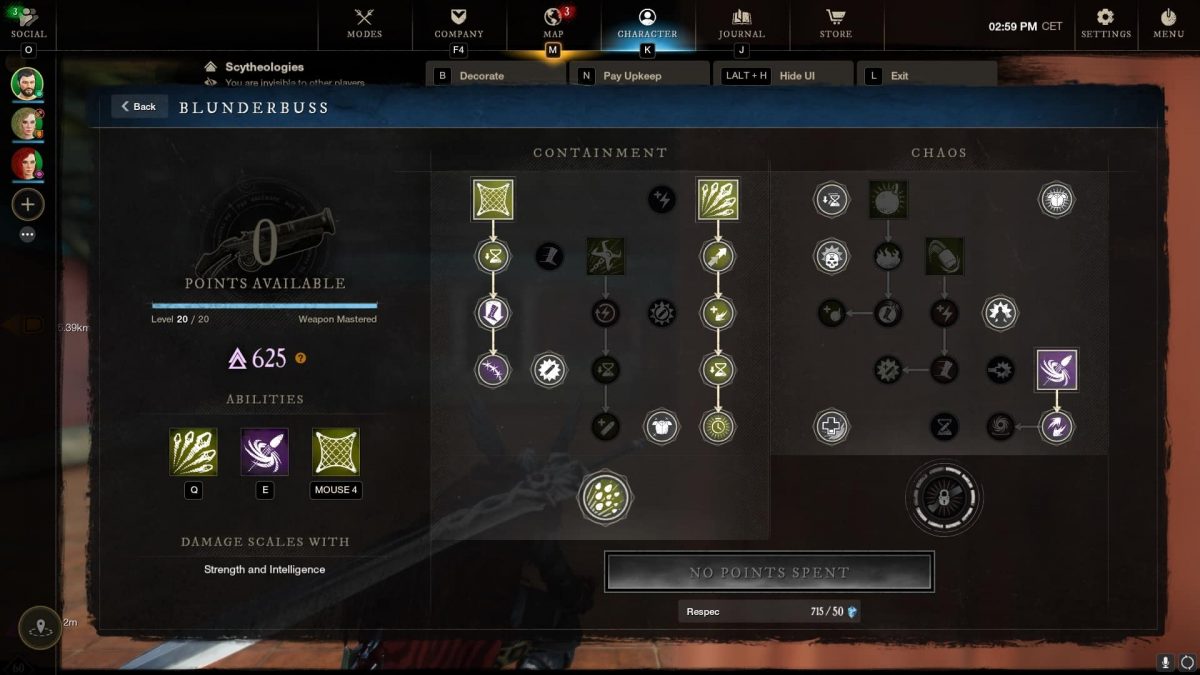
For the medium armor build however, you will want to build a fairly different path in your skill tree. The Blunderbuss in this case will provide full utility and opt to drop Unload and Azoth Shrapnel Blast for Double Down and Claw Shot. This version of the build tree has a quite surprising amount of synergy, providing multiple initiation or chase options and debuffs, but also multiple passives to regain stamina or ability cooldowns.
Attributes
In order to gain optimal damage you will want to take the following:
- 450 Strength
- 150 Constitution
Equipment
In this section of the Build, we will break down what equipment you will use. This includes things such as armor perks, weapon perks and equip weight.
You will want to be in either the light equip weight or medium equip weight category. Light will give you additional damage and mobility with the light dodge roll, whereas medium will give you more survivability at the cost of a tiny bit less damage and mobility. The way to obtain light equip weight for this build is the following:
Medium chest, light helmet, gloves, legs and boots.
The way to obtain optimal medium equip weight for this build is the following:
Heavy chest, heavy helmet, medium gloves and boots, light legs.
Barrier to Entry
Obtaining best in slot (BIS) gear can be a very daunting and expensive task. The recommendations below are ultimately what you should aim for. However, if you’re new to the build with no existing gear and perhaps want to try the Greatsword Blunderbuss PvP build you will want to obtain 5 stacks of Health, and the weapon perk Relentless Freedom on an armor piece. You can potentially round off purple gear pieces with Elemental Aversion in the remaining slots as its a pretty affordable 2-perk piece now.
This will allow you a competitive entry point to try and test the build before committing and progressing to better gear.
Armor
Artifact Armor
For this build, we recommend the following Artifact Armor pieces:
- Tumbler Shoes – Successfully dodging an attack, gives you 15% empower and 25% fortify for 5s, you are also healed for 200 + 2% of your max hp.
- Featherweight Jacket – Weightless: This armor is weightless
- Nimble Leather Coat – Highly Refreshing: Reduces max cooldowns by 10%.
- Unyielding – Hard Head: PvP Only: Receive 20% less damage from critical hits.
Most of the armor you need to run the Greatsword Blunderbuss build will be obtained through crafting or random drops. Below are the recommended perks for your setup:
- Refreshing (4)
- Elemental Aversion (5)
- Freedom (3)
- Relentless Freedom
- One additional Freedom or if you are medium armor Slowing Rupture
You can also flip Freedom and Elemental Aversion to be 5 Freedom and 3 Elemental Aversion if you prefer additional crowd control reduction.
Weapons
Greatsword
Artifact Weapon
For this build, we recommend using the Artifact Weapon – Serenity. Serenity’s main perk is Balanced Blade: Offense stance: +2% empower per attack for 5s (max 10 stacks) Defense stance: +2% fortify when hit for 5s (max 10 stacks). This Weapon is incredibly powerful and as a result, is a no-brainer choice for the build.
Alternative Choice
For the Greatsword you will want to ideally obtain the following perks:
Trenchant Strikes
Arboreal Attunement
Keenly Jagged
OR
Plagued Strikes
If you are rolling a 2 perk Greatsword to start off with, focus craft or purchase the perks highlighted in purple until you can get a legendary or BIS version. This will have to be a crafted weapon. It is also good to note that Keenly Empowered is not a worthwhile perk on the Greatsword, as it is usually near or at empower cap all the time.
Some decent farmable options to use as a placeholder are the following:
Fleshripper – Dropped by mobs in the Greater Tribulation area of Shattered Mountain
Heelstrike – Dropped by Tazorjaw in Ebonscale Reach
Putrefaction – Dropped by level 60+ mobs in the open world (farmed easiest in Brimstone Sands, also drops in elite chests in the area)
Sonic Sword – Dropped by Broadpaw and Gnasher
Supplicium – Dropped by mobs in the Opulence area of Shattered Mountain
Slipstream – Dropped from Mozrul the Herald in Great Cleave
Blunderbuss
For the Blunderbuss you will likely have to craft your own or purchase a specific one for this build as it is fairly required to have the Net Shot perk on the weapon itself along with two mandatory other perks. You will want to look for the following perks:
Arboreal Attunement
Keenly Empowered
Exhaustive Net Shot
Much like the Greatsword, aim for the purple highlighted perks if you are starting out and don’t want to commit yet. We recommend finding a slot on your armor for Exhaustive Net Shot if you do not have it on your Blunderbuss yet.
Jewelry
Amulet – Ideally you will want the meta perks of Health, Stamina Recovery and Slash Protection. However a farmable option would be the Champion’s Amulet from the PvP track. For an artifact, we highly recommend “Ankh”.
Ring – For your ring, you can utilize the Champion’s Ring from the PvP track if you are starting out. Ideally however you will want to look for Slash Damage, Invigorated Punishment and either Hearty or Leeching.
Earring – For your earring, you can farm out the Doom’s Chance from the Lazarus Instrumentality Expedition. However, ideally an earring with Refreshing Toast, Regenerating and Purifying Toast will be the best option. “Endless Thirst” is another great Artifact choice.
Gems & Runeglass Gem Upgrades
For this build you will want to use Runeglass of Punishing (5) in your armor as your most consistent damage source is the Greatsword. You can use a mixture of opals and onyx gems to ensure you have at least 15% slash protection and a decent coverage of elemental protection. You can substitute out a couple of opals for emeralds to boost up thrust protection as well versus bows and muskets or even spears.
For weapons, make sure to slot in Runeglass of Electrified Opal into both of your weapons, ultimately you can pick almost any element however.
Heartgem Rune
The Heartgem rune of choice for this build is the Brutal Heartrune of Detonate due to the synergy with timing several abilities at your disposal such as Claw Shot or Skyward Slash, locking your opponent down to secure a successful hit. Cunning Detonate is rarely the most optimal version of Detonate for this build due to Greatsword being at empower cap or very close to it most of the time. Due to this high uptime, you are losing too much if you do not use Brutal. Another option if you prefer a defensive Heartgem rune that has risen in the meta for melee players is the Stalwart Heartrune of Stoneform. This Heartgem rune prevents you from getting caught up in too much crowd control and gives additional sustain, as you will take a lot of damage usually in melee range.
Consumables
You will want to utilize the following consumables for this build:
Powerful Honing Stone
Infused Health Potion
Infused Regeneration Potion
Hearty Meal
You can opt to use Gemstone Dust of any tier or Oakflesh Balm.
Along with the above consumables make sure to use an attribute food depending on the attribute distribution you have on your gear and what you require as a result. You can check a full list of consumables by checking out our consumables guide.
How to Use Build
The Greatsword Blunderbuss build primarily focuses on dealing heavy melee damage to single targets. With some flexibility to engage or assist clumps of opponents. The majority of your damage comes from your Greatsword heavy attacks.
Greatsword Usage
More often than not you will want to open your encounters with either Skyward Slash. Or if you are in a simple situation, land a heavy attack and shift into Onslaught Stance using the Aggressive Shift passive. Should you open with a successful heavy attack your Skyward Slash will provide 5% additional rend. Following Skyward Slash you will want to follow up with Relentless Rush to stay on top of your opponent as they have most likely dodge rolled after Skyward Slash, this will allow you to root your opponent too as you are in Onslaught.
From here you can either crush your opponent with heavy attacks until the kill is picked up or if you are versus an opponent with good mobility, you can opt to roll chase them and catch them with Steadfast Strikes. Landing Steadfast Strikes will disrupt the opponent and allow you to gain stamina back, making your previous dodges essentially free and as a result, pick up the kill.
Medium Armor Rotation
If you are playing the medium armor build, the opener becomes Roaring Rupture. This is due to the fact that if you initiate with this ability and it lands, you are granted multiple buffs and most importantly immunity to crowd control for 5 seconds. This allows you to pull off your full combo uninterrupted and land a couple of heavy attack before it times out. Unlike Berserk, Roaring Rupture’s immunity prevents even Shockwave or Wrecking Ball from hitting you, which is incredible.
Blunderbuss Usage
The Blunderbuss will mainly serve as an initiation tool in a lot of cases. However it provides a couple of disruption options or damage options depending on whether you play light or medium.
In light you will often look to catch your target with a Net Shot to start things off, allowing you to close the gap and reduce their stamina regeneration thanks to Exhaustive Net Shot. Usually from here you would look to swap into the Greatsword and start crushing the opponent and applying constant pressure.
However with the damage version of the Blunderbuss tree, bringing your opponent to low health with the Greatsword gives you the opportunity to finish them with a burst from Azoth Shrapnel Blast, if they attempt to escape. Finally, if you are using Splitting Grenades you can hit some cheeky combos. Primarily by firing out the grenades onto a target or crowd and immediately following up with Skyward Slash and Relentless Rush. More often than not if the Skyward Slash connects and staggers the opponent the grenades will true combo every time.
Blast Shot is a utility tool that allows you to either disrupt players by knocking them down, or provides you with a grit option that can help you disengage. It is worth noting that Blast Shot also provides rend! There are very rare occasions also in which you can push several enemies into a teammates Gravity Well. This is both comedic but epic.
In medium armor the Blunderbuss serves a full utility purpose. The engage with Net Shot is still true throughout the entire build. Although you also have the option of chasing or engaging with Claw Shot! With this build style your Blunderbuss is definitely the weapon you pull out in a pinch. To either protect yourself, take less damage or chase with, killing with the Greatsword. This version of the build also provides you with more ability output due to Double Down as well! Another strong feature to note is that the Fortify passives on the Blunderbuss tree, namely Fortifying Aggression and On A Roll persist on weapon swap. As a result, always make sure to keep a high uptime. Switch to the Greatsword to make use of the resistance it provides.
Finally, keep a good track of the synergies you have within the Blunderbuss tree for the medium armor build. Claw Shot actually allows you to have good stamina regeneration benefits from In-and-Out. So keep that in mind when using Blunderbuss defensively. It is important to note that many perks rely on landing pellets reduce cooldowns from an ability. Or use ability usage to give you global cooldown reduction. Keep an eye on what makes you more efficient!
A final note, make sure to use Net Shot to initiate. Gap close with the Greatsword. Then use tools such as Claw Shot and Blast Shot to chase them after forcing out abilities.
Check out more builds here.

