Hello everyone and welcome to our Lost Ark Glaivier PVE Guide! Here you will see the best PVE Raid Builds, Stats, Skills and Gameplay for both the Pinnacle and Control build paths.
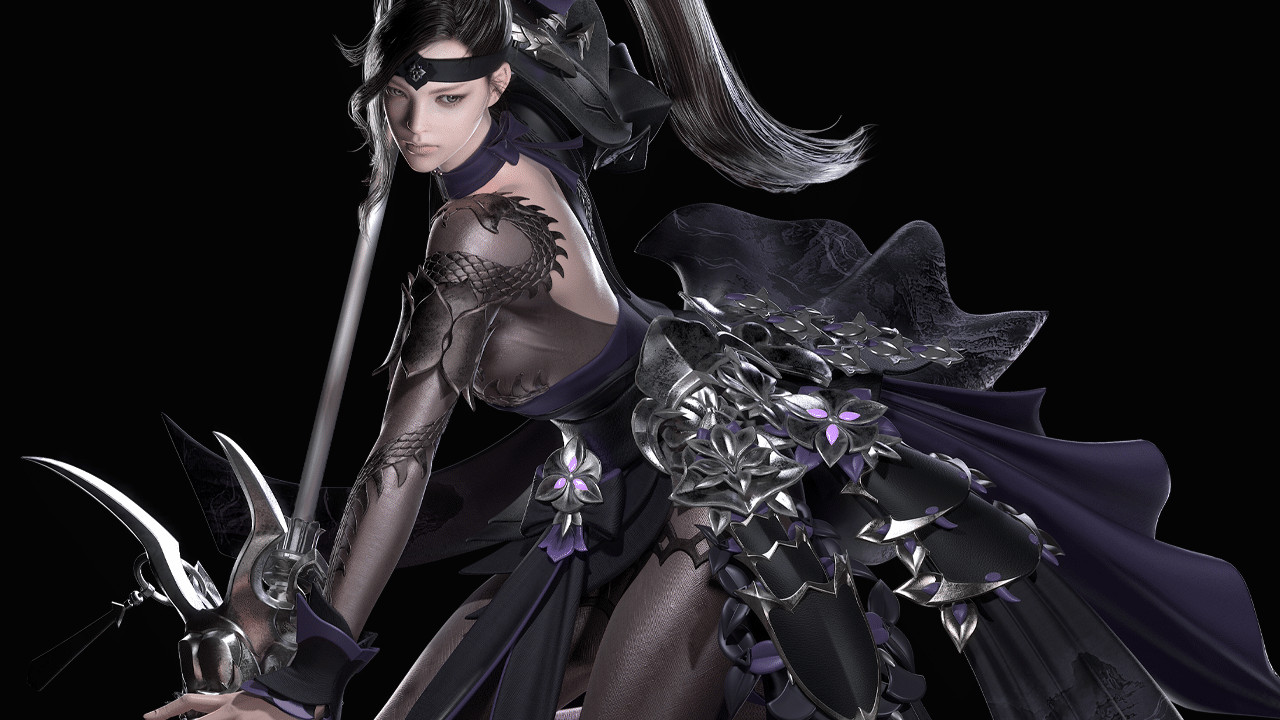
The Glaivier is a greatly-ranged melee DPS Advanced Class from the Martial Artist family. Specialised in dealing massive amounts of damage relying on the huge Dragon attacks and Stance Switching to create the ultimate melee powerhouse. Having access to her Spear and her much bigger Glaive. Does fancy footwork and incredible skill feedback take your fancy? Then this guide will provide you all will need to know to get started on your Glaive wielding adventures in the best way possible!
Leveling
Starting out as a Glaivier you’ll want to focus on distributing your Skill Points in your lowest cooldown skill(s) that can assist you in clearing out mobs along with your harder hitting spells primarily for the bosses you’ll face but also to assist with mob clearing. You’ll find that the Glaivier is not super beginner friendly.
Leveling however should give you a good amount of time to figure out the class. She does have great access to AoE in her Flurry Stance along with great boss killing tools in Focus Stance. As a rule of thumb for Skill Point distribution you should prioritize leveling up the following Skills:
– Stampeding Slash: An early go-to spell with decent clear damage.
– Half Moon Slash: Another early damage builder, feel free to put a few points into this skill to reach the first tripod.
– Raging Dragon Slash: Another decent Cooldown spell that provides quick and easy AOE damage.
– Cutting Wind: This skill is a great additional source of AoE damage.
– Starfall Pounce & Red Dragon’s Horn: Both great boss slaying tools with some additional mob cleave.
After these prioritizations are made you are free to distribute Skill Points into abilities that enhance your enjoyment of the leveling process. It is recommended though to find time to max out Raging Dragon Slash and Half Moon Slash first. They will carry your damage heavily throughout the process.
Note: Do not fret! You can reset your skills at any point so any mistakes/regrets along the way, you’ll be able to fix that to your preference.
Stats and Skills
In short you’ll be focusing on a mix of Crit/Specialization early on to maximize Identity gauge gain & damage dealt.
General tips
– Glaivier has fairly decent AOE & damage potential, kiting mobs into a more compact spot before unleashing your rotation will aid you in speeding up clear times between Cooldowns.
– While leveling, utilize your mount as much as possible.
– Keep a keen eye on your Identity gauge as you’ll be wanting to activate this as frequently as possible to speed up clears.
Max Level
Once you hit level 50 you’ll be heading to Beatrice, your guide throughout the Main Quest and who you’ll visit at the beginning to pick your initial class in Trixion. You’ll complete her questline to receive your first Awakening spell, Spear Meteor.
You’ll now be given some choices in your build path moving forward, based around either of the class engravings; Pinnacle or Control. These two builds will be your main options going forward when attempting Guardian Raid, Abyss Dungeon and Abyss Raid content.
Builds
Pinnacle Build
This build revolves around using the Class Engraving Pinnacle, which relies on colossal buffs given to you by maxing out your Identity gauge and Stance Swapping. The Glaivier makes use of both her Stances in this playstyle (Focus and Flurry). After this burst you’ll be looking to build up the gauge again as soon as possible to get as much damage windows as possible via the Pinnacle buffs.
Brush up on your boss knowledge within the Guardian Raids, Abyss Dungeons and Abyss Raids activities so you can get the most out of your Identity Stance Swaps.
The Pinnacle buff sees you receiving the following:
– 20% Damage increase, 50% Critical Damage and 15% Movement Speed for Focus switching.- 15% Damage increase, 25% Critical Hit Chance and 15% Attack Speed for Flurry switching.
Pros & Cons:
Pros
– Identity buff is colossal
– Very versatile
– Strong Stagger options
– Has unique Parry Skill
Cons
– Needs high stats to be relevant
– Limited Engravings
– Average damage in Class
Skills and Stats
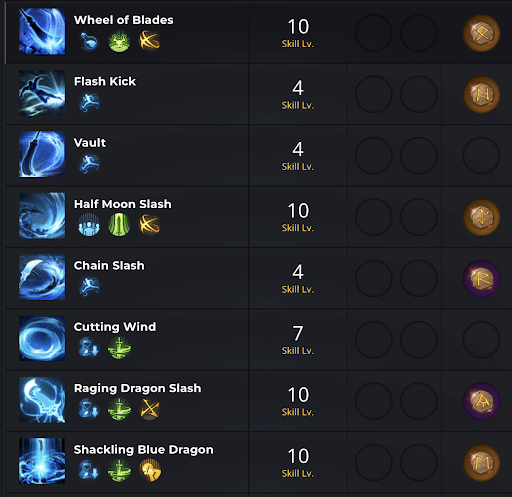
When using the Pinnacle Build make sure to go for an 80/20 split of Specialization and Swiftness for optimal gameplay.


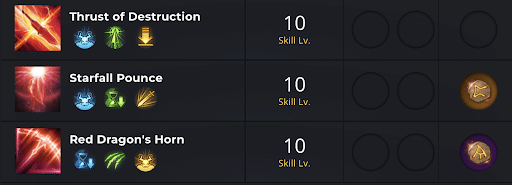
The Skills above are the most optimal for the Pinnacle build. This build style is also known as the “4 Blue 3 Red” build. Ideally you’ll prioritize getting Level 10 on Red Dragon’s Horn, Raging Dragon Slash and Half Moon Slash, then raise the levels up of the other Skills as you obtain more Skill Points.
Gameplay
The aim of the game when playing Pinnacle Glaivier is to always count to 3 when it comes to your Identity. You rarely want to see yourself overcap on Identity gauge segments by overusing skills. This will also help you conserve Mana. As a result try to always keep track of how many skills you use in a Stance before switching to gain maximum benefit from it.
With the Pinnacle build you can opt into heavy Focus usage as we have above to aid you in generating more Identity for more damage.
Opener/Rotation
Thankfully in this version of the Glaivier you are not living and dying by back attack damage which gives you more leeway when picking moments to use your rotation on the content you are facing.
Your rotations differ based on which Stance you find yourself in at any given time, our Lost Ark Glaivier PVE Guide recommends the following:
Focus Stance
1. Red Dragon’s Horn
2. Starfall Pounce (You can also use this first if you need to reach the target)
3. Spiraling Spear
4. Thrust of Destruction
Note: If your Identity gauge is full this is the time you switch to Flurry.
Flurry Stance
1. Cutting Wind (Example usage)
2. Chain Slash
3. Shackling Blue Dragon
4. Raging Dragon Slash
5. Half Moon Slash
6. Wheel of Blades
Note: If your Identity gauge is full this is the time you switch to Focus.
Pinnacle Engravings and Gems
The Engravings below are ordered top-left to bottom right, from highest priority to lowest.

You’re looking to equip Pinnacle & Grudge as your main engravings to smooth out the build’s intentions. Please note that Grudge should only be taken when you know you’ll have it at level 3, the benefits do not outweigh the negatives Grudge gives you on level 1 & 2.
Gems
| Attack Gems | Cooldown Gems |
| Raging Dragon Slash | Red Dragon’s Horn |
| Half Moon Slash | Shackling Blue Dragon |
| Starfall Pounce | Half Moon Slash |
| Wheel of Blades | Raging Dragon Slash |
| Red Dragon’s Horn | Thrust of Destruction |
| Thrust of Destruction |
Gear Tripods
In Tier 3, you will find yourself obtaining gear that has Tripod effects on them. Essentially these Tripod effects can alter the Level of your Tripods on Skills. As a result finding the right Tripod effects for your gear can further power up your Glaivier to even greater heights! Be on the lookout for any Tripod effects that apply to the following Skills:
– Red Dragon’s Horn
– Raging Dragon Slash
– Starfall Pounce
– Wheel of Blades
– Thrust of Destruction
– Shackling Blue Dragon
– Half Moon Slash
Control Build
This build revolves around using the Class Engraving Control, which trades in the ability to change stances to instead be incredibly agile with the ability to spam skills in Flurry Stance. This build is very simplified compared to the Pinnacle build option. However this means that it is likely great for players new to the class, but you would miss out on the full experience Glaivier has to offer.
You will find yourself using Final Decision on your skill trees due to the lack of Identity usage because of Control preventing you from switching stances.
Pros & Cons:
Pros
– Easy to manage
– Strong spam ability
– Strong Stagger options
Cons
– No major buffs or second stance
– Relies heavily on Back Attack
– Average damage in Class
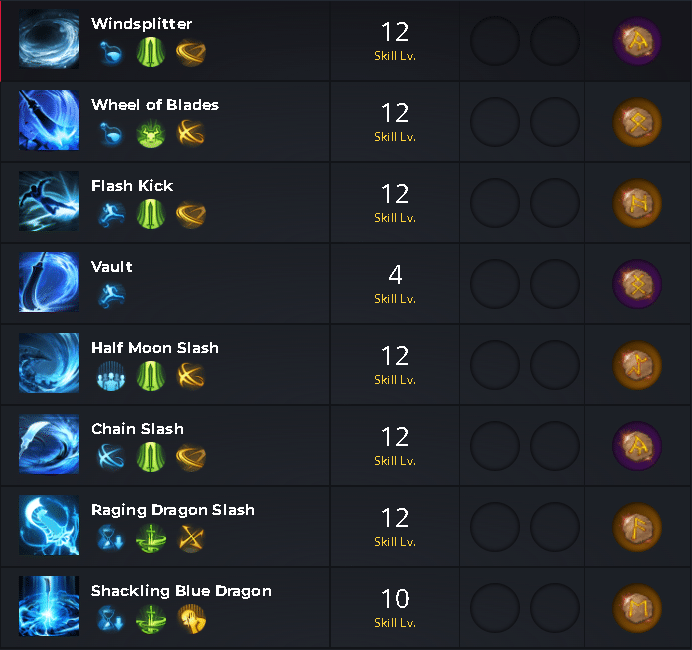
Skills and Stats
When using the Control Build make sure to go for an 80/20 split of Swiftness and Crit for optimal gameplay. This will allow you to spam abilities frequently.


Gameplay
The aim of the game when playing Control Glaivier is to essentially spam most of your abilities as you see fit when they’re off cooldown. Much like the Sorceress’s Class Engraving, Reflux. The one thing you can modulate however is stacking up your Identity gauge to then spend the bar using skills that have the Final Decision tripod.
Opener/Rotation
The Opener/Rotation options can be pretty much whatever you feel like. However in this instance our Lost Ark Glaivier PVE Guide recommends:
1. Use Spear Dive and Flash Kick to position yourself behind the boss as much as possible to make the most out of your damage.
2. Shackling Blue Dragon
3. Half Moon Slash
4. Chain Slash in between most abilities
5. Wheel of Blades
6. Raging Dragon Slash
7. Windsplitter
As previously mentioned this build eventually allows you to spam almost anything you want in the rotation and as a result is pretty easy to pull off.
Control Engravings and Gems
The Engravings below are ordered top-left to bottom right, from highest priority to lowest.

You’re looking to equip Control & Master of Ambush as your main engravings to smooth out the build’s intentions. Please note that Grudge should only be taken when you know you’ll have it at level 3, the benefits do not outweigh the negatives Grudge gives you on level 1 & 2.
Gems
| Attack Gems | Cooldown Gems |
| Raging Dragon Slash | Wheel of Blades |
| Half Moon Slash | Shackling Blue Dragon |
| Chain Slash | Half Moon Slash |
| Wheel of Blades | Raging Dragon Slash |
| Flash Kick | Chain Slash |
| Windsplitter |
Gear Tripods
In Tier 3, you will find yourself obtaining gear that has Tripod effects on them. Essentially these Tripod effects can alter the Level of your Tripods on Skills. As a result finding the right Tripod effects for your gear can further power up your Glaivier to even greater heights! Be on the lookout for any Tripod effects that apply to the following Skills:
– Windsplitter
– Raging Dragon Slash
– Flash Kick
– Wheel of Blades
– Chain Slash
– Shackling Blue Dragon
– Half Moon Slash
Cards Sets
Cards are an additional system that you’ll find becomes very important the further into the endgame you get. Below you will find the recommended and by far best sets for Glaivier.
(Budget) Lostwind Cliff: This is a budget version of Light of Salvation, which is the best endgame set. This is much easier to complete since Solas and Seria are easy to collect with the help of the Traveling Merchant.


(Endgame) Light of Salvation: This set is hands down the best endgame set. The only downside of it really is it will take a long time to collect. So while you’re collecting it, use the Lostwind Cliff set for the meantime.


Thank you for checking out our Lost Ark Glaivier PVE Guide! As a result I hope this helps you become one of the best Glaivier players in Lost Ark! We will make sure that we update this guide in the future since Lost Ark can make any changes for the Class.

